Laying the Groundwork
The Cogynt platform has two main working parts: Authoring, where users create and process models, and then Workstation for analysis. This guide covers each step in that process, and may require you to partner with others on your team for certain tasks. This guide assumes you are either a data scientist/engineer or a data analyst working with a modeler.
Cogynt's setup works around 5 steps:
- Laying the groundwork for modeling.
- Preparing files.
- Creating Processing Logic.
- Pulling data into Workstation (ingestion).
- Viewing and analyzing data.
The first step in the process is to give your data a place to go by doing the following:
- Create a project: A project is the container for all the different parts of a model.
- Create a deployment target: A deployment target defines a model's data sources, Flink configuration, and logging configuration.
- Create a topic: A topic is a unit of data that Apache Kafka uses to organize and store events.
Find detailed instructions about these items at any time at the links provided, or see the Cogynt Documentation.
Create a Project
First, you'll create a project to store your model.
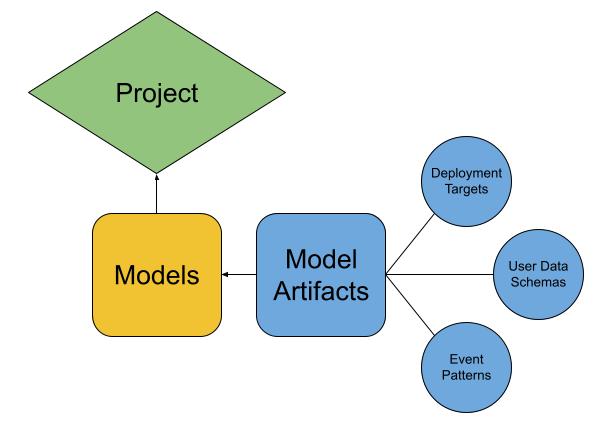
All models in Cogynt exist within projects. Models contain model artifacts. Model artifacts are data entities. They can be anything from a person's address or name to a criminal record or risk score. Projects hold all parts of a model, making it possible to work on many models using the same model artifacts.
There are three places to create projects in Cogynt:
- On the Actions page, where Cogynt Authoring first opens.
- In the system panel.
- On the Project Management page.
Each of these locations leads to the Create Project window, where you can define and save a project as follows:
- In the Name field, enter a name for the project.
- In the Description field, enter a description for the project if desired.
- When finished, click Create to create the project, or Cancel to discard it.
With your project created, it's now time to create a deployment target.
Create a Deployment Target
A deployment target identifies event patterns for deployment, and defines a model's data sources. You'll use the Deployment Management utility to set the initial deployment target. For more information, refer to Deploying Models and Deployment Targets in the Cogynt Authoring User Guide.
Access the Deployment Management utility to start creating a deployment target:
- Click the system panel (☰) icon.
- Under Other Tasks, click Deployments.
This brings you to the Deployment Management window. From here, you can put together your deployment target as follows:
- In the Deployment Management window, click the Deployment Targets tab.
- Click the Project dropdown menu, then select the appropriate project.
- Click the Add New Deployment Target (+) button.
- The Create Deployment Target dialog pre-populates the necessary fields with a set of common values. If you need to make changes, see Creating Deployments or Editing Deployments. Otherwise, click Create to create the deployment target.
Note
The connection information for an Apache Flink cluster is not a part of a deployment target, as it should have already been set up and configured as part of the Cogynt installation process. If this information is unavailable, contact your system administrator, or reach out to Cogility Support.
Once you have finished creating your deployment target, the next step is to create a topic.
Create a Topic
A topic is a Kafka data structure that organizes messages and events. Cogynt's Data Management Tool provides mechanisms for easily creating topics and uploading data into Cogynt.
Note
You can use whatever means you prefer to create your and enter data into your source topics in Kafka (for example, by using a Python script or Jupyter notebook, or with the help of a third-party data app such as NiFi or Databricks).
To create a topic using Data Management Tool:
- Open Data Management Tool.
- On the landing page, click Data File Upload.
- From the Select Project dropdown menu, select the project you created earlier.
- Beneath the Select Topic dropdown menu, click Use New Topic.
- In the New Topic window, in the Topic field, type a name for the topic. (Note: For this exercise, the other fields can be left with their default values.)
- Click Confirm.
- From the Select Deployment Target dropdown menu, select the deployment target you created earlier.
Note
When you create a topic, it is only saved when you upload data to it. Avoid navigating away from the screen until you've uploaded some data. Otherwise, you will need to create your topic again.
If you are using a shared Cogynt environment, give your Kafka topic a unique name.
For more information about Kafka topics, refer to the official Apache Kafka documentation.
Now that you have established a place for your data, the next step is to prepare your data file so that Cogynt can handle it properly.