Uncovering Mule Bank Accounts with Hierarchical Complex Event Processing and Bayesian Risk
Suppose a criminal has a few million dollars that they want to get into a bank account without attracting the attention that million-dollar deposit would draw. Banks and payment providers can be useful to them if they can utilize all their friends and neighbors and relatives to move small amounts of money around back to a source account. These accounts are known as "mules," and can be difficult to detect in real time.
Undetected events add up quickly, but Cogynt's hierarchical complex event processing is perfect for such an operation. It uses signals and risk weighting to catch these mule bank accounts on a no-code platform. This guide helps break down these concepts and build a simple model that calculates risk.
Our sample dataset is limited in volume, and the numbers and ideas used in this model are arbitrary. We would expect any large-scale bank to collect account statistics and real-time transaction details, so this model reflects and emulates a real approach to fraud detection.
Getting Started
The first task in this exercise is to upload data into Cogynt, which is a three-step process:
- Create a project. Projects store the models you'll build.
- Create a deployment target to specify the model's data sources.
- Upload a data file for Cogynt to process.
Our support documentation offers help uploading a data file to Cogynt or using the S3 data connector.
Be sure to create clearly named topics, such as bank_transactions and bank_accounts, for readability. Readable topics help simplify testing and model building.
This guide assumes users have already uploaded some data files consisting of at least a few hundred records, and have already run schema discovery.
Define the Bank Fraud Model
A basic event pattern built in Authoring looks like:
IF [EVENT1]
    AND IF [EVENT2]
    AND IF [EVENT3]
WHERE [CONSTRAINT 1], [CONSTRAINT 2], [CONSTRAINT 3], etc
THEN [NEW EVENT]
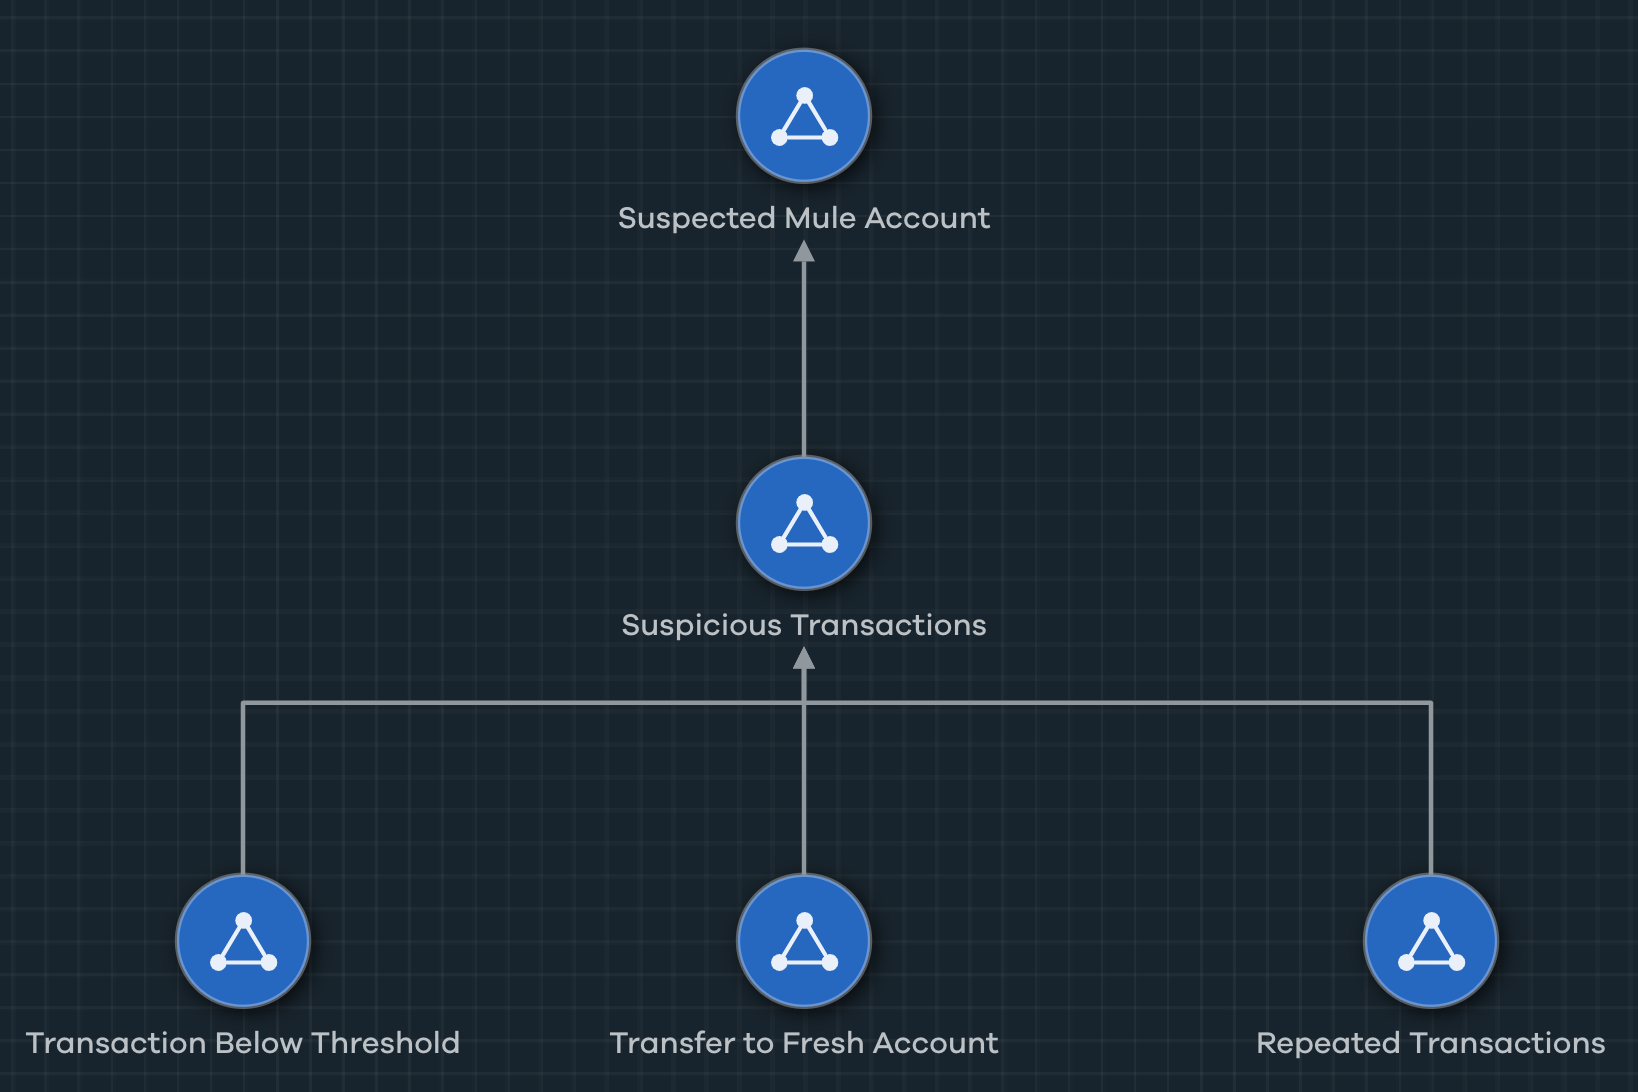
The Cogynt GUI lets us build a Hierarchical Complex Event Processing diagram. The end result looks like a pyramid, but we can think of the model like so:
- If transfers are made to accounts less than 24 hours old, and:
- If transactions occur below a $1500 threshold.
- If repeat transactions occur 3 or more times to the same account.
- Where the above combination meets a certain risk level.
- Then, flag the account and its owner as suspicious.
One of these signals on its own can be coincidental, so our model should see multiple signals before considering an account or transaction as suspicious. As these events occur, they are published by Authoring and ingested into Workstation.
Using Cogynt Workstation, our analysts should then be able to build collections for each mule account that contain relevant transactions and details that contributed to the risk.
Add Logic to The Model
The simplest pattern to walk through publishes an event when a transaction occurs that is below a $1500 threshold. The event pattern consists of one event pattern node that is linked to itself, and a published solution indicates when a given transaction is below threshold. This solution also contains the details that Cogynt should publish, should this event occur.
Add an Event Pattern Node for Bank Transactions
First, we will add an event pattern node to our event pattern.
To add an event pattern node:
- From the top left side of the Hierarchy View, click Add New Event Pattern Node.
- Select the Event Type that represents the required pattern. For this model, our event type is called
Bank Transactions. - Click anywhere in the hierarchy view to place the event pattern node. A default name is given to the node.
- Click the node to open its edit panel in the right side drawer.
- Enter a name for the node into the Name field.
- Enter a description of the node that describes its logic in your model into the Description field.
Creating Computations
We have placed the event node, but it needs to know what to do.
To create this kind of logic, we'll use computations:
- From a view containing the pattern element, click the connect button.
- Drag the connection from one element to itself or to another element. This part of the model requires us to drag the connector to itself. A new window opens to Create a Constraint.
- From the Create a Constraint window, select the schema fields the constraints should refer to. We need to know the
amount. - Select the second pattern element that should be compared. We need to add a constant representing our $1500 threshold.
- Beneath the second pattern element, click Computations.
- From the computations screen, select Add a Constant, followed by Integer Constant. Fill in $1500 as the constant's value.
- Select a Comparison Option. For our model, we will select
less than.
With the above completed, we have an event pattern for each time the amount is less than our constant of 1500. We are ready to create an outcome and add computations to it.
Partitions
A partition instructs the system to analyze events based on a particular field within a specified event pattern. We want each transaction ID that meets our criteria for the event pattern. In this case, we want to know the details for each transaction below our $1500 threshold.
See Creating Partitions in the Cogynt Authoring User Guide for more details.
To create a partition for your event pattern:
- In Cogynt Authoring, navigate to the diagramming area.
- Click the event pattern node you created.
- In the details panel, click the Contents tab if it is not already selected.
- Under Attributes, click the Partitions section to expand it.
- Confirm that the Enable Partitions toggle is set to "on." (If it is set to "off," click the toggle to set it to the "on" position.)
- Beside the Enable Partitions toggle, click +.
- In the Create Partition dialog:
- From the Elements dropdown menu, select the event pattern you created.
- From the Fields dropdown menu, select the field to partition over. For this exercise, select the
txn_idfield. (Note: The Fields dropdown menu cannot be opened until a selection has been made from Elements.)
- Click Create.
The partition will now publish a unique solution for each transaction in the data set. Workstation will then process each unique solution as a separate record.
The next step is to define an outcome for the event pattern.
Event Pattern Outcomes
An outcome represents output data in a model. Once Cogynt finds a pattern you've defined, an outcome tells the system what to do after that discovery. For more information about outcomes, see Working with Outcomes in the Cogynt Authoring User Guide.
To create an outcome:
- In Cogynt Authoring, navigate to the diagramming area.
- In the diagramming area, click the event pattern node you created.
- In the tool palette, click Add Outcome (▭).
- In the Select Event Type dialog, click New.
- In the Create Event Type dialog:
- In the Name field, type a name for the outcome. (For this exercise, "Amount Below Threshold" is recommended.)
- In the Topic field, enter a Kafka topic name. It is recommended that the Kafka topic name matches what you've entered in the Name field as closely as possible, using underscores (_) instead of spaces. (For this exercise,
amount_below_thresholdis recommended.) - From the User Data Schemas dropdown menu, select the schema you previously used.
- Click Create.
Once you have defined an outcome, the next step is to set some computations to process the data points your outcome generates.
Mapping Computations
With our event pattern node in place, and our outcome established, we need to add some final logic to ensure Cogynt Workstation ingests and publishes data we want. Too much data can overwhelm analysts, whereas too little won't provide meaningful context.
To add a computation element to your model:
- In Cogynt Authoring, navigate to the diagramming area.
- In the diagramming area, double-click the outcome you created.
- Right-click to open the tool palette.
- In the tool palette, click Map Input Element.
- Click the event pattern used (
Bank Transactions). - Click any open space in the diagramming area to place the computation element.
- Click and drag fields from the "Bank Transactions" input node to the "Transaction Below Threshold" to connect them. Establish the following connections:
amounttoamountdest_accounttodest_accountevent_timetoevent_dateandCOG_timestampsource_accounttosource_accounttxn_idtotxn_id
- When finished, click your model's name in the top navigation bar to return to the event pattern home screen.
With your computations set, you have now configured the first part of your pattern.
A full list of computations is available here. Building them is roughly the same process each time. Repeat as needed to build out the logic and fill in your model.
Challenge
Can you complete the following?
- Publish an event called
Transfer to Fresh Accountwhen a source bank account conducts a transaction where the destination account's creation date is less than 24 hours old.- Publish an event called
Repeated Transferswhen a given source bank account conducts 3 or more transactions with the same destination account within a 30-90 minute timespan.
Testing and Validating Your Model
As you construct the model's patterns and events, you will want to test to see the outcome is giving you data you want to see. The most common method is to deploy the model in progress and use Cogynt Workstation to visualize events.
This exercise uses Kafka Control Center to further ensure topics are publishing data correctly.
To use Kafka Control Center:
- Navigate to your organization's Kafka Control Center URL.
- From the main screen of Kafka Control Center, click the running cluster that contains your data.
- From the left side menu, click Topics. A database containing topics appears.
- From the top of the screen, search the name of an event pattern topic. In our case, a search might query for
txn_below_threshold. - Click the name of the topic. The topic's overview screen shows a number of metrics.
- Locate Storage. Bytes of total data and Bytes of data on disk should be non-zero values.
- Locate Partitions at the bottom of the screen.
- Locate the Offset Column. Start and End indicate the size of the topic in terms of number of entries. Start will always be zero, and End should always be some other non-zero number.
Check each topic in your pattern to ensure data was properly deployed.
The next section covers using Cogynt Workstation for bank fraud analysis.