Finding Fraudulent Accounts in Cogynt Workstation
Cogynt Workstation ingests the events produced by Authoring, where a number of useful widgets help analysts better understand the outcomes produced. The tasks for this use case are to:
- Find each suspected mule account and view drilldown data to understand why a mule account was flagged.
- Create a collection for each suspected mule account.
- Add all events that contributed to the mule account's suspicion to the collection.
This part of our use case guide focuses on accessing and using tools in Cogynt Workstation.
Ingest Data
The bank fraud model we built in Authoring must be ingested into Workstation before our analysts can see the events it published. Data Ingestion will tell us the number of Unique and Total records ingested.
To ingest data:
- At the top of Cogynt Workstation's home page, click the Admin tab.
- On the left side of the admin page, locate the Ingestion Settings column. This column lists each event created in Cogynt Authoring sorted by Type or Ingestion status.
- Toggle the Status switch in the right-most column in Ingestion Settings to ingest that data.
Event Notification Settings
If you chose to assign risk scores to your model, you can utilize them in Workstation with the the event notifications widget. This widget helps streamline workflows for teams with defined investigators and leads.
Some suggestions to get started:
- Set the event notification's Visibility within the admin screen.
| Visibility | Permission Description |
|---|---|
| public | All users with read permissions for Admin: Notification Settings can view the setting, and those with write permissions can edit the setting. All users can see unique event notifications that a public setting triggers. |
| private | Only the user who created the Notification Setting can view and edit it. Other users can only see event notifications produced by this setting if they are manually assigned to it. |
- Optionally, in the Assign To field, choose whether there is a default user to receive any event notifications produced by this setting.
| Assign To | Permission Description |
|---|---|
| No one | No user receives event notifications triggered by this setting by default. The unique notifications can be assigned to users from the event notifications widget. |
| Any specific user | Any event notification or update triggered by this setting is automatically assigned to this user and triggers a system notification for them. |
- Establish a risk threshold using the Risk Range slider. Event notifications are issued when the risk score falls within the range defined.
Tip
We suggest a Risk Range above 70 to avoid spam notifications. Adjust the slider's upper and lower values within the range of 0 to 100 with the highest precision possible to home in on notifications that meet those defined risk thresholds.
- Assign an optional Notification Tag to filter for and color code specific event notifications.
Note
A unique event notification generated by these settings can always be reassigned at a later time regardless of whether its notification setting is public or private.
Add Widgets to an Existing View
We begin by adding some widgets to our Workstation view.
- In the lefthand drawer of any open view, click the grid icon to Add Widgets to the View... The lefthand panel changes to a list of widgets.
- Locate the widget to add to the view from the list, then click +. We need the following widgets:
- Event Stream, or Notifications Stream (if notification settings were defined).
- Object Details Viewer (usually more than one).
- Collections.
- Link Analysis.
- Click the close icon (X) beside Add Widgets to the View... to close the drawer.
The view is updated and saved automatically as you add and manage the widgets housed within it. We can also use multiple views with the same workstation data. Each view is independent of other views that may be opened. We can create multiple views, each suited to its own set of widgets.
Try creating these example views and saving them as view templates:
- A view containing Event Notifications, Object Details Viewer, Collections, and Drilldown widgets. This view gives the lead analyst a space to review risk history, assign events to other analysts or start building collections.
- A view containing Event Notifications, Object Details Viewer, Link Analysis, and Collections widgets. This view is for the analyst to dig deeper into transactions and networks of accounts.
We can save each of these views as a template that others on our team can access and use.
Basic Workflow
With our view(s) containing the widgets we need, it's time to define our workflow:
- Event notifications are fed to the event notifications widget.
- Sort by tags, assigned users, time window, or change sort order to narrow down results.
- Drag notifications into Object Details Viewer to review them.
- Drag account events into drilldown to review the event's provenance.
- Create collections containing account details, and other identifiable information for the suspected mule accounts.
In Workstation, we accomplish these tasks by dragging widgets into other widgets.
Understand Event Provenance
With drilldown, analysts can develop a fuller picture of the event's provenance. Most helpful for understanding what triggers led to the event in question, it's an effective way to isolate causal events.
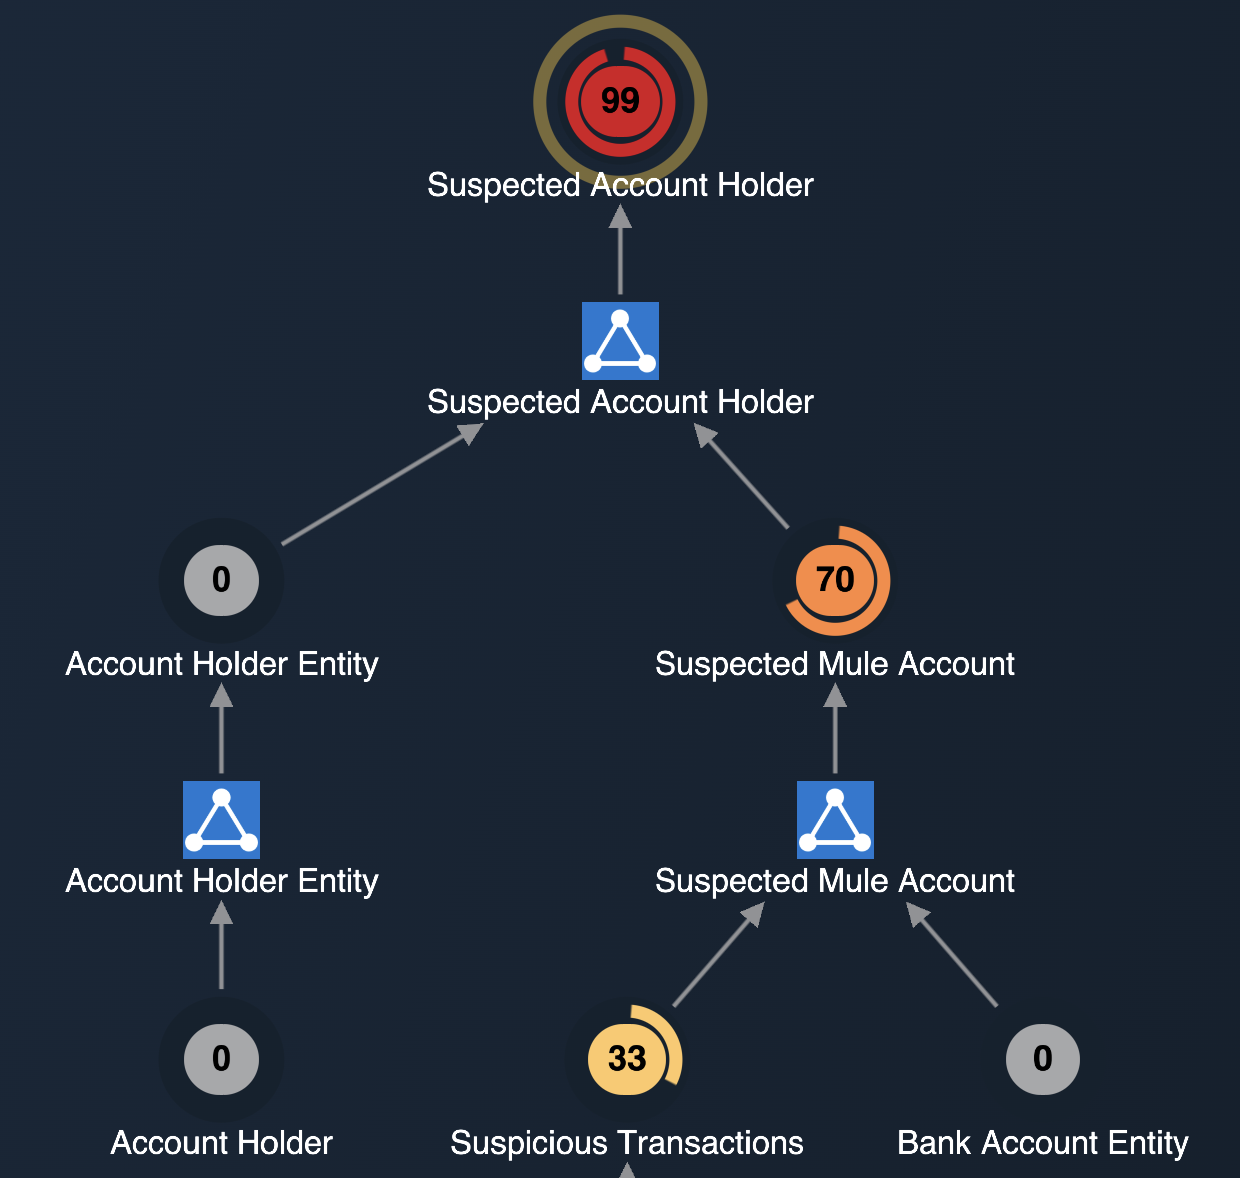
Once an event or event notification is dragged into the drilldown widget, it displays:
- Circles containing numbers representing the event's risk level. (A donut around the node visually represents risk level.)
- Color-coded nodes according to risk level, from most severe (red) to least (yellow).
- Square icons representing pattern solutions, or instances in Authoring where a pattern was matched and produced an event.
Build Collections for Each Account
Collections are like a folder that hold all related events. The objective of this exercise is to create a collection for each suspected mule account. The collection should contain:
- The mule account itself (which should be the subject of the collection).
- All suspicious transactions flagged related to this account.
- Other accounts used by the mule account to move funds.
At this point, you can drag events into other widgets easily. Using tools like link analysis and drilldown, can you build collections to catch every mule?